Hummingbird Feeder Heater : For -10˚ Celsius Weather – And Colder.
 |
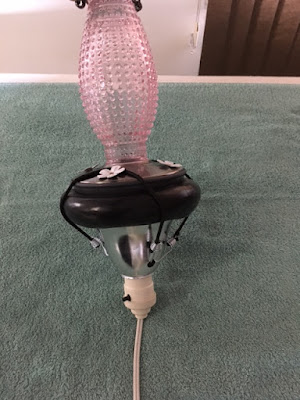
| The final - tested and proved design; the spacer ring of wire shown here is removable and therefore can be used with any feeder design. Use the wire spacer for delicate plastic bottoms that are too close to the bulb, or when the temperatures rise enough to warrant having a spacer to expel excess heat. |
For the first time in my life I am seeing humming birds still hanging around in cold, snowy December winter conditions! Granted, we do live in the Kootenay region of British Columbia, Canada where winter can be quite cold and frosty, but to have a bird not migrate as usual is strange indeed. We've seen them stay late into October before, but never this late.
As soon as we realized they were not going away for winter we started with daily checks and a thermos cozy (see pic) that conveniently fit the feeder and zipped closed around it. But by mid December the temperatures had the solution in the feeder freezing hourly. While getting a second hummingbird feeder allowed us to have one outside and one inside - thawing, we found that this was far too time consuming.
I searched YouTube and discovered some great ideas that I experimented with finally discovering a combination of tools that I used to create my own version.
It is easy to replicate my hummingbird feeder heater design. This type of heater will easily handle -5 to -10 Celsius winters that we typically experience in Creston, BC. This December we are seeing even colder weather, -17˚C Tuesday night with colder weather predicted yet to come in the week ahead.
Materials are:

1 - light reflector from the hardware store.
1 - 50 Watt heavy duty incandescent bulb. You can not use an LED as it does not provide sufficient heat.
2 – bungee cords (I found small bungee cords of 10” length but you can use small, flexible wire as well).
1/2” Foam pipe insulation (with adhesive strip) – approx. 24” length needed per reflector.
Electrical tape
Scissors to cut insulation
1/2-1/4" wide section of fine wire fence, or stiff wire - to create spacing if required.
* You might find some of these items used, in your local second-hand, thrift shops. Alternatively post a request for these items in your local free-cycle or community conversation groups found on FaceBook.
Remove the clamp part of the light reflector and put aside for something else you invent for its use later on. Remove the light bulb.
Without removing the strip or cutting the foam insulation, gently fit the foam tube around the rim of the light reflector - mark the area to cut where the foam makes a complete circle. You may have to do a raised area depending on where your feeder bottom sits - avoid getting too close to the light bulb! As you can see from Glenn's design he allowed for this issue. Our rose coloured hummer feeder worked fine sitting on the foam, but the other design needed more of a buffer from the light bulb, however having lost one feeder to the tray being too close to the bulb had us rethinking the design and including a small buffer to help deal with excess heat. Adjust according to your situation and the temperatures you may be fighting. Other control options may include dimmer switches or possibly lower wattage bulbs.
I prefer glass and metal hummingbird feeders, they last longer... like decades, but they usually come with a grey plastic bottom tray. Red Barn Farm store here in Creston (BC Canada) have some with metal bottoms that may be a better option for winter feeding.
Remove the foam tube and make the cut, then ease it gently back on the reflector, but not pressed in yet.
Starting at one end, remove the first inch of strip of tape that covers the adhesive and press the exposed adhesive well to ensure a good seal. Gently ease the rest of the strip out as you press the foam onto the reflector.
Repeat for the other side of the adhesive making sure to fit the seam as best as you can.

Pay special attention to the top edge of the foam ring, keeping it even. The electrical tape used in the next step will even up most flaws in the seam or wrinkles in the foam ring so don’t worry about the foam ring being perfect.
Use electrical tape (they come in a variety of colours) to seal the outside surface of the foam. Wrap slowly, carefully, sealing the tape along the way. This will prevent damage (from the elements, or bungee cords) and give it a water-proof coating that is easy to wipe clean.
Now insert the light bulb.
Using the bungee cords to loop over and attach the heater to the feeder, (as seen in the picture) test out the fit and ensure the contact between the two is without gaps to ensure maximum efficiency.
When I tried the first one I found that even without the thermos cozy on it the solution stayed unfrozen, despite the -17 C that we had overnight.

 |
It was a great relief when I woke up to see the little Anna (the type of hummer that is overwintering here this year) feeding happily on nice warm food.
So please share this with everyone that may have a chilly hummingbird out there wanting for some unfrozen sugar/water solution in this cold season.
So please share this with everyone that may have a chilly hummingbird out there wanting for some unfrozen sugar/water solution in this cold season.
Do not let your feeder dry out. Check occasionally to ensure the feeder bottom is not too warm. If it is, give it more of a buffer between the feeder bottom and the heater. Glue another layer of foam on, or put an inch of wire fence material between the heater and the feeder as Glenn had done (see pics). Turn it off if you are having -1 or warmer temperatures.
Chirp...Chirp
 |
Here, you can see the thermos cozy in action on one of our feeders - this feeder (above) however ran dry and melted on the bottom and therefore we decided to add a wire buffer, giving it a half inch space between the foam and the bottom of any feeder that we have now and any we might have in the future.This spacing allows excess heat to dissipate. |
 |
This feeder has no cozy and is less protected where it is located, yet hasn't had any issue dealing with the cold weather after installing the heater without a buffer, however we installed a ring of wire anyway (seen 1st pic above) to avoid future issues. |
Chirp.
Comments
Post a Comment
Thank you for your comment!
http://www.twitter.com/brummet
http://www.facebook.com/lillian.brummet
http://www.linkedin.com/in/ldbrummet